The development cycle of Flutter: A demonstration
i.e., what makes Flutter different right from building the first app.
This article is heavily outdated. An updated version is hosted at https://royarg02.github.io/writing/intro-flutter/

Having experience in programming of about 7 years in various languages limited to the consoles, I always wanted to explore software development beyond the black screen. One area that particularly interested me, was Android and its app ecosystem. I had been meaning to start mobile development for quite a few years, but the development processes then were a bit overwhelming to me.
And then I came across Flutter, not even a year ago. Honestly, its not-so-difficult learning curve, ease of building custom designs and quick development caught the attention of the designer in me and intrigued the programmer in me, and I was instantly hooked. If you had asked me about Flutter about a year ago (from the time of writing this article, of course), I wouldn’t even have the slightest idea.
And that’s how easy getting onboard with Flutter is. But what made me convinced that Flutter is my jam? Let me try to elaborate the same by shedding light on the thing that would be immediately noticed upon using Flutter, right from building the first app: The development cycle.
TL; DR: Hot Reload, which pushes updated code to instantly reflect changes without losing state, and the ability to write both logic and the layout of the application in the same language declaratively, makes building apps in Flutter a breeze.
The Development Cycle: Build, Tweak, Hot Reload, Repeat.
I would like to point out that, since I have a bit of experience in Android native, I would mostly compare Flutter with Android development.
What makes the development cycle of Flutter different from native implementations? Consider the following:
- How much time does it take for you to make out what the application would appear or perform just by looking at the code? (This makes more sense when you return to an old project) In the android side of things, you would have to comb through more than two different types(namely, Java or Kotlin and XML) of files representing the multiple “views” a typical application would likely have.
- How many lines of code would you have to write to implement a custom UI?

- How much time did you wait to just get the application running in your test device (I’m looking at you, Gradle), only to find out it has an error and you have to rebuild it again! 🤦♂️
Now, what if I told you, that Flutter:
- …is quick: Flutter follows a declarative approach, similar to frameworks like React, Swift UI and Jetpack Compose. “Declarative” effectively means that you only define what you want to see, but leave out the details about how you want to see it to the framework. This makes it easier to make sense of the code, and also to prototype any app quickly since you are only declaring the properties and the appearance of the UI. For Flutter, we have something called the Widget tree, which defines the relationship between different elements of the app. More on that later.
- …is fast: Sub-second “Hot Reload” makes building and iterating upon the application during development much faster than native frameworks. So you would build an app, realize that you need to change something, tweak the code, Hot Reload, and boom! Your changes immediately take effect. We will have a look at Hot Reload a bit later.
- …is open: Flutter follows a “custom-first approach”. What this means that unlike it being closed source, or written in native language and only handing out APIs, the entire framework is open and written from the ground up in Dart, the same language used in Flutter. This makes it very easy to dig deep into the source code and easily customize them to build elements which were not there in the framework in the first place. Plus, it is a good source for documentation as well!
The elephant in the room: Hot Reload
So what is the uniqueness of hot reload that makes it worthy of a mention every time Flutter is spoken of? Well, atleast it’s the thing that brought you to this article in the first place. If time for your app development has its greater share taken by just compiling, Hot Reload just might be the thing you need to gain ultra-fast development (yes, I mean it). Hot Reload makes developing apps much faster by having changes immediately take effect moments after you press a button, and continue along without any hindrance with lost states.
This “sub-secondness” doesn’t end with adding or removing only a few elements and changing some properties, rather, entire screens can be swapped or new screens can be added or removed.
How is this possible? It is one of the consequences of Flutter using Dart, a language made by Google that happens to have a very fast Just in Time (JIT) compiler provided by the Dart Virtual Machine. An abstract explanation of the hot reload process follows:
- Upon making changes and hot reloading, the Dart VM reloads (or injects) the libraries(files) that have been changed into the heap memory, replacing them with the older versions to be taken care of by the garbage collector.
- Upon reloading, the VM rebuilds the widget tree incorporating any added/removed elements of the app(This “widget tree” may consist of a single element or multiple elements).
- After that, the VM forces the rendering engine to produce a new frame having the changes to be displayed at the output.

What’s more interesting about Hot Reload is that unlike purely restarting, the state(current configuration) of the app does not reset, which means you can continue tests from where you were before reloading.
Fun fact, hot reload works beyond Flutter too! You can check out this tweet for an example of Hot Reload on Dart command line.
Enough said, let us move on to the demonstration the title of the article mentioned.
Consider this the end of “Part-I” of the article, effectively.
A demonstration of the development cycle: Making a dice roller
This section turned out to be way “beginner-friendly” than I was hoping it to be, although it leaves out some of the details. If you had been meaning to start learning Flutter, the next section is quite the worth to read. If you are already acquainted, you can skip to the next section.
Again, to stress this, the following guide is outdated and uses deprecated features. An updated version is hosted at https://royarg02.github.io/writing/flutter-dev-cycle-demo/
What are we building?
Let’s say we wish to make a dice roller app, which would have the following properties:
- A control to roll the dice(display a random image of a dice face). The image of the dice face would depend upon a random number between 1 and 6.
- A control to “reset” the dice(display nothing/a white space image). It would display only if the random number is reset to zero.
- For the sake of completion, a control to simply count up the faces of the dice, up to 6. The image of the dice would change accordingly.
Let’s get started.
Step 0: Making sense of the UI
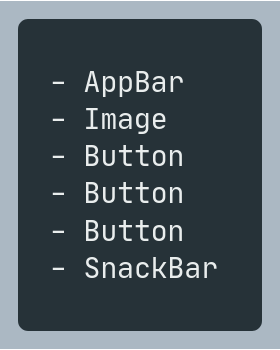
Taking a look at the UI, we see the following elements to be included:
- An AppBar
- An Image
- Three buttons
Additionally, a SnackBar has to be invoked when we press the “Roll” button.
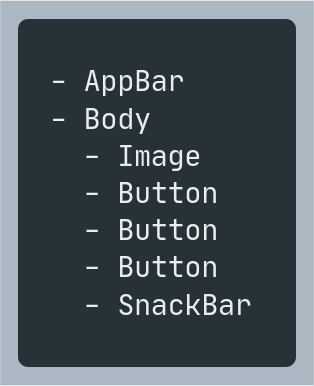
Grouping the elements which display in the “background” of the app as the “body” of the app, we get the following arrangement:
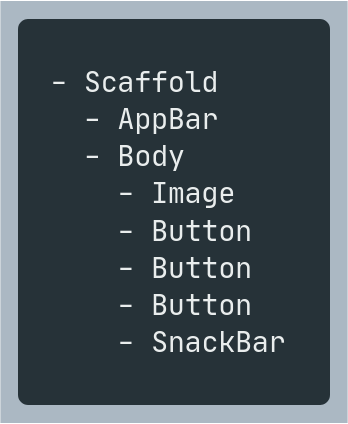
Now, an element in Flutter that takes in an AppBar and a Body is Scaffold, thus we can continue the arrangement of the elements as:
Since we are building an application that would contain these elements, wrap these elements under a MaterialApp…

…and we have the widget tree of the application.
As far as building an application layout is concerned, the widget tree is just that. Since Flutter doesn’t need any separate language to define the layout, thinking instead about the widget tree is the first thing a Flutter developer would probably do when building an app. Once getting a hang of this, you would be able to break any layout into boxes and go straight to coding without hesitance.
Now as we have the widget tree figured out, let’s get to actual coding.
Step 1: Implementing the widget tree
Here’s (more or less) the widget tree above translated into Flutter (along with some more code):
Let’s go over the code for a bit. The import statement includes all the elements(said as widgets from here) to be used in the app as the material.dart package, which holds all the widgets following the Material Design system. If you would like to build an app following the Human Interface guidelines, the UI system used by iOS and other Apple operating systems, you can import cupertino.dart instead. This is helpful if you would like to build an iOS app(and happen to be developing on macOS) which would make its users feel at home.
Next up, use the main() function, which is the entry point of execution of any Dart program. This function calls another function runApp() which, as the name suggests, runs an “app”, which is here passed to the function as the App() object.
App() is nothing but an object of a simple Dart class, which behaves as a widget by inheriting from a special class StatelessWidget. These widgets do not have a state, which would imply that they never change their configuration in the app, be it through appearance or functionality.
In the App class, override build(), which returns the widgets which are under the current widget in the widget tree(in other words, these widgets create the App() widget), to be displayed on the screen. The BuildContext object it takes denotes its location in the widget tree. Here, the function returns a MaterialApp, whose home parameter is passed a widget we wish to see after the splash screen.
The Scaffold widget provides a template for building any screen of an app following the Material Guidelines. It provides various placeholders, of which, we use two, appBar and body.
Trying to run the app now would result in an error, as flutter does not have a widget named Body. Let us define the same.
Step 2: Defining the Body widget
Just like any other widget, define Body as…
…a subclass of StatefulWidget, which implies that this widget has a state, upon which the appearance or behaviour of the widget depends. The state may change due to user interaction, like when we press any button of the app, or the completion of some task. The state of the widget is defined as another class; here as _BodyState, whose structure looks very similar to the definition of any StatelessWidget. An object of _BodyState is returned in the createState() function of the Body class.
One more thing to note here. Putting an underscore (_) in front of any identifier in Dart makes it private for the file (or library), which means that it is inaccessible outside the file. As the state of any StatefulWidget is only useful for the widget itself, making it private is generally a good idea.
Step 3: Building the body of the app
Referring back to Step 0, we need to implement an Image, and 3 buttons for the body, arranged vertically.
In Flutter, a widget that vertically lays widgets is Column. It takes multiple widgets as a list to be placed vertically one under the other, as children in the widget tree and aligns them according to some arguments.
In our case, Column could be used as:
Let us try running the app now.

We wouldn’t have to wait this long next time for applying changes, as we will see.
Step 4: Defining the functions to be invoked on button press
To use buttons, we need to specify what we want the app to do when the buttons are pressed.
The three buttons of our app are supposed to do these three things:
- Provide a random number between 1 and 6.
- Reset the state of the number to 0.
- Increment the state number up to 6.
Notice that we are dealing with the state. Since a StatefulWidget is already being used here, we can define a state variable as a member of the state class:
The state variable here is named _dice holding the current value of the dice, initially set to zero.
Now import the following library:
This library has the usual mathematical functions and constants, along with a class to create a random number generator. Use the math alias here to simplify some code to write later.
Let us define the random number generator:
The math.Random() function takes an integer as the seed to generate numbers.
Now define the required functions we talked about as members of _BodyState:
The nextInt() method of the Random object gives a number from 0 up to the argument (exclusive). So to get a number between 1 and 6, we get a number from 0 and 5 and add 1.
Each of these functions calls the setState() function, which takes in another function which updates the state. It then rebuilds the widget tree such that the effect of the function is reflected in the app. If the functions are defined as:
and continued along, the changes wouldn’t take effect, as the widget tree would not be rebuilt.
Step 5: Defining the buttons
For buttons, use the ̶R̶a̶i̶s̶e̶d̶B̶u̶t̶t̶o̶n̶ ElevatedButton widget, which among many, takes two parameters: child and onPressed. The first parameter is typically used to display the label, using a Text widget. The latter takes the function which would be invoked every time the button is pressed.
Let us now include the buttons in Body:
Since functions are treated as first-class objects in Dart, you can pass functions to the onPressed parameter of each ElevatedButton just like some other object.

Step 6: Importing offline assets
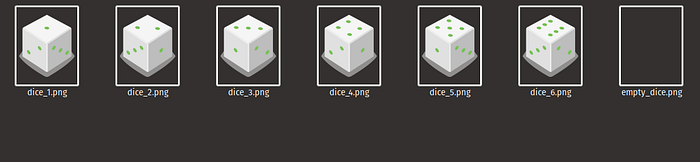
Suppose you have the following images to display the dice faces:
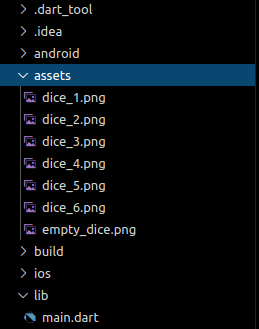
Now to add them in our app, let’s create a folder to put them in:
To use these images in our app, you need to “import” them, but not like any library file. Enter…
pubspec.yaml
This file provides information about various dependencies required to build our app. This includes any offline assets.
By default, there are commented statements guiding you to use your assets:

Likewise, with proper indentation, write:
That’s it! After saving, these assets would be available to us through their location in the project folder.
Step 7: Using offline assets
To use images, Flutter provides the Image widget. As we are including assets to be used as images in our app, use the Image.asset() constructor instead. I’ve explicitly set the dimensions of the image using the height and width parameter.
Now we would only need to make the image change according to _dice.
Step 8: Changing image on the dice roll
This is as simple as defining another function that returns the location of the image depending on the value of _dice…
… and using the function in the Image widget.
Since the widget tree is already rebuilding using setState() in the functions for the buttons, any changes will automatically take effect.
Step 9: Implementing the SnackBar
The snackbar in the app is shown when we press the ROLL button. To do that modify the _rollDice() function:
The first statement constructs a SnackBar object to be used later(the const keyword caches the SnackBar object as it doesn’t change between rebuilds, and provides a little less performance overhead). The amount of time the snackbar should stay visible on the screen is determined by the duration parameter. The last line invokes the function to display the snackbar on the screen.
Now, even if the app generates the same random number, you can be sure that you rolled the dice.
Step 10: Finishing touches
Our app is mostly done, except
- aligning the image and the buttons.
- setting colour and the text of the appbar.
Going back to the Column widget for vertical alignment, write:
Passing these arguments, you align the children of the column exactly at the center, vertically(the main axis of the Column widget).
Also, for centering the column horizontally, wrap it with the Center widget:
And as far as the appbar is concerned, write:
If you had been with me during this (very long) article, the meaning of this code snippet would easily make sense to you.
And there you go! You just created your Flutter app from scratch!
What did it cost?
Everything…?
So in a matter of simple 10 steps, you’ve just created:
- A beautiful application, courtesy of the easily customizable Material Design.
- An application guaranteed to run in 60 fps natively.
- An application which runs on Android and iOS.
- A web application, possible in Flutter beta(as of October 2020).
- A desktop application, possible in Flutter dev or master(as of October 2020).
- A raspberry pi application, but not before porting the flutter engine.
- Likewise, an application ready to be deployed on any environment of your choice, if you are able to port the flutter engine there first.
Also, you’ve done mostly everything the development of a Flutter app involves, including widget refactoring, using custom widgets, bringing in assets, a bit of state management, some theming, and not to mention, using Hot Reload.
All from a single codebase.
Final Thoughts
Finally, here is the complete source of the app:
I’m sure that building the same app in Android native would have had made me jump into multiple files writing more code (Once again, not comparing this with iOS).
What I showcased was a sliver of what Flutter could provide you in app development. If you are interested, do visit the website and give it a spin, read the docs, go through the framework source code, read some more articles and watch tutorial videos. If you are unsure, take a peek in any way. If this article didn’t convince you, those would definitely will.
Best of luck for your future Flutter endeavours!
If you liked this article, do clap to show your appreciation! If you would like to, provide feedback through reaching me at Twitter, or just browse my website.
